3D Workspace
Home
Assets
Affiliate Program
Creator Program
Sign up/Log in
View Plans
DCC Bridge
saikatm497
12-28 10:57
Model Name
goddess lakshmi statue 3d model
Tags
goddess lakshmi statue
padmasana
props
props realistic
props rendering
props rendering realistic
realistic
rendering
rendering realistic
Input
Prompt
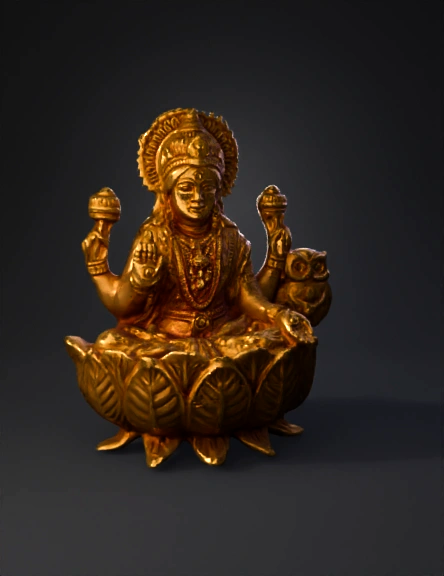
Below is a **professional, step-by-step ZBrush workflow** to make **this Lakshmi Mata (seated on lotus with owl) 3D model**, exactly like the image you shared. I’m explaining it **from zero to final STL**, suitable for **idol / jewellery / casting work**. --- ## 1. Reference & Planning (VERY IMPORTANT) * Collect **front + side references** of **Lakshmi Mata**, **lotus base**, and **owl (vahana)**. * Decide **final use**: * Idol / murti * Jewellery master (casting) * Decide **size** (e.g. 60 mm / 90 mm height). --- ## 2. Base Mesh Setup ### Option A (Best for speed) * Open **ZBrush → Tool → DynaMesh Sphere** * Resolution: **128–192** * Turn on **Symmetry (X)** ### Option B (More clean) * Import a **human base mesh** * Use **ZRemesher** for clean topology --- ## 3. Blocking the Main Body (Primary Forms) ### Tools: * **Move Brush (B M V)** * **Clay Buildup (B C B)** * **Standard Brush (B S T)** #### Steps: 1. Block **head, torso, legs (padmasana pose)**. 2. Keep shapes **simple**, no details. 3. Separate SubTools: * Body * Head * Arms (each arm separate) 👉 Focus only on **proportion**, not details. --- ## 4. Head & Face Sculpting ### Brushes: * Clay Buildup * DamStandard * Move * Smooth #### Steps: 1. Rough face structure: * Nose * Eyes * Lips 2. Add **calm, divine expression**. 3. Sculpt: * Tilak * Forehead * Chin softness 4. Keep face **symmetrical and clean**. --- ## 5. Hair & Crown (Mukuta) ### Hair * Mask scalp → **Extract** OR * Clay Buildup strokes for hair flow * Smooth lightly ### Crown 1. Create new SubTool → **Cylinder / Sphere** 2. Shape crown using **Move + Inflate** 3. Add pattern: * DamStandard * Alpha stamps (optional) 4. Add **halo ring** behind head. --- ## 6. Arms, Hands & Mudras * Create arms as **separate SubTools** * Use **Transpose** for positioning ### Hands: * Sculpt fingers carefully * Upper hands holding: * Lotus / pot (kalash) * Lower hand: * Blessing mudra (varada) 👉 Jewellery casting tip: **Thicken fingers slightly** (avoid breakage). --- ## 7. Cloth & Ornaments ### Cloth (Saree) * Mask body → Extract thin mesh * Sculpt folds using: * DamStandard * Pinch * Smooth ### Jewellery: * Necklace * Bangles * Waist belt Use: * IMM brushes * Or simple cylinders refined manually --- ## 8. Lotus Base (Very Important) 1. New SubTool → **Cylinder** 2. Shape base 3. Create lotus petals: * Duplicate petal * Rotate using **Transpose** 4. Add vein detail: * DamStandard 5. Merge petals after placement. --- ## 9. Owl (Vahana) 1. Start from **Sphere** 2. Block: * Head * Eyes * Beak 3. Feather detail: * Minimal (casting friendly) 4. Place owl slightly behind right side. --- ## 10. Detailing Phase (Secondary & Tertiary) ### Brushes: * DamStandard * Pinch * Inflate * Smooth #### Add: * Facial softness * Cloth folds * Ornament edges * Lotus veins ⚠️ Do NOT over-detail if this is for casting. --- ## 11. Polishing & Cleanup * **Polish by Features** * **Deformation → Smooth** * Remove noise * Ensure: * No floating parts * No extremely thin areas --- ## 12. Merge & STL Preparation 1. **Merge Visible** 2. **Dynamesh (High resolution 512–1024)** 3. Check thickness (especially hands, lotus tips) 4. **Decimation Master** * Pre-process * Decimate (20–30%) --- ## 13. Export * Tool → Export → **STL** * Ready for: * 3D printing * CNC * Jewellery casting --- ## PRO Tips (From Jewellery CAD Experience) * Avoid sharp undercuts * Keep minimum thickness **0.6–0.8 mm** * Slightly exaggerate facial features * Always test print small size first --- If you want, I can also: * ✔️ Give **exact brush list with shortcuts** * ✔️ Create **ZBrush layer-wise workflow** * ✔️ Explain **casting-safe detailing**
Detailed Info
Related Models
Enter invite code
Enter invite code to get credits!