3D Workspace
Home
Assets
Affiliate Program
Sign up/Log in
?
Upgrade
DCC Bridge
Anonymous1766607004
12-24 20:33
Model Name
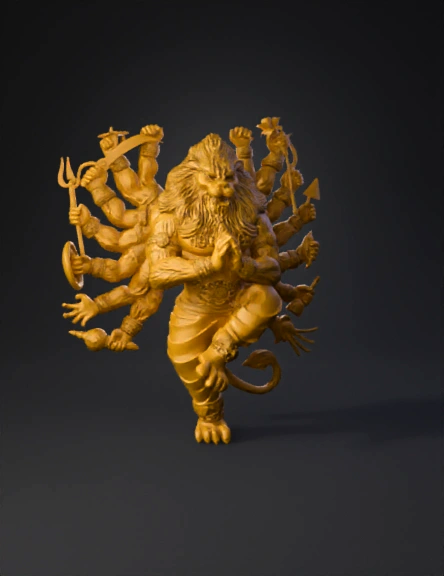
golden multi-armed deity 3d model
Tags
character
rendering
realistic
Input
Prompt
Below is a **ZBrush-specific, professional workflow** to create this **multi-armed Narasimha (lion-headed deity) 3D model**, written exactly the way **murti / idol / high-detail sculptors** work in ZBrush. --- ## **ZBRUSH WORKFLOW – NARASIMHA MULTI-ARM SCULPT** --- ## **1. Project Setup** * Open **ZBrush** * Set document scale (do not rely on zoom) * Import reference images into **SpotLight** * Enable: * **X symmetry** (for body & face) * Later use **Radial Symmetry** for arms --- ## **2. Blocking the Base Form (DynaMesh Stage)** **Tools Used:** `ZSphere / Base Human Mesh / DynaMesh` ### Steps: * Start with a **simple humanoid base** * Convert to **DynaMesh (low resolution)** * Block: * Torso * Legs (one raised, one grounded) * Tail (simple tube) * Create a rough **lion head block**: * Skull mass * Jaw volume * Eye sockets 🎯 *Focus only on proportions, not details* --- ## **3. Pose the Body** **Tools:** `Transpose Master / Gizmo 3D` * Pose before detailing * Bend: * Raised leg * Torso twist * Adjust balance so model can stand * Freeze pose using **TPoseMesh → TPose→SubT** ⚠️ Never detail before final pose --- ## **4. Sculpt Primary Anatomy** **Brushes Used:** * Move * Clay Buildup * DamStandard * Smooth ### Body: * Define: * Chest mass * Shoulder volume * Arm & leg muscle groups ### Lion Head: * Sculpt: * Brow ridge * Nose bridge * Jawline * Keep eyes deep and strong 🎯 Primary forms must read clearly in silhouette --- ## **5. Mane & Hair (Layered Workflow)** **Brushes:** * Clay Buildup * Move * DamStandard * SnakeHook (controlled) ### Process: 1. Block mane as **large flowing shapes** 2. Divide into mid-level clumps 3. Add fine hair grooves last ⚠️ Avoid thin hair – casting unsafe --- ## **6. Multi-Arm Creation (Radial Symmetry)** **Tools:** * Gizmo 3D * Array Mesh * Radial Symmetry (R) ### Steps: * Sculpt **one complete arm + hand** * Duplicate using **Radial Symmetry** * Adjust angles manually for natural flow * Merge arms to torso with DynaMesh --- ## **7. Hand Poses & Mudras** **Brushes:** * Move * Inflate * DamStandard * Sculpt: * Prayer hands at center * Weapon-holding hands * Maintain proper finger thickness * Slight bend in fingers for realism --- ## **8. Weapons & Accessories** **SubTools Created Separately** * Trident * Sword * Bow & Arrow * Chakra * Conch ### Process: * Block each weapon using: * ZModeler / DynaMesh * Merge to hands after placement * Thicken edges for printing safety --- ## **9. Clothing & Ornaments** **Brushes:** * Clay Buildup * Standard * DamStandard * Sculpt dhoti folds: * Primary folds first * Secondary creases later * Add: * Arm bands * Wrist cuffs * Waist belt * Use **Layers** for non-destructive detail --- ## **10. High-Detail Pass** **Subdivision Levels Added** * Subdivide gradually * Add: * Fur texture on face * Skin pores (very subtle) * Engraving on ornaments * Sharpen with **DamStandard** 🎯 Details must support form, not overpower it --- ## **11. Cleanup & Optimization** **Tools:** * ZRemesher (optional) * Decimation Master ### Steps: * Check: * Thin geometry * Floating parts * Merge all SubTools if required * Decimate while preserving detail --- ## **12. Final Export** * Export as: * **STL** → Printing / Casting * **OBJ** → Rendering * Test STL in slicer software --- ## **Professional Tips (Murti / Jewelry Work)** * Use **Polygroups** for arms & weapons * Avoid extreme undercuts * Keep minimum thickness: * Idol: **1.5–2 mm** * Jewelry: **0.6–0.8 mm** * Always test print small scale first --- If you want, I can also: ✔ Give **exact ZBrush brush settings** ✔ Convert this into **pendant / relief version** ✔ Share **client pricing & time estimate** ✔ Guide **from ZBrush to metal casting** Just tell me 👍
Detailed Info
Related Models
Enter invite code
Enter invite code to get credits!