3D Workspace
Home
Assets
Affiliate Program
Creator Program
Sign up/Log in
View Plans
DCC Bridge
thekillerqueenof87
12-06 15:05
Model Name
animatronic bunny 3d model
Tags
animatronic bunny
character
character game asset
character game asset stylized
character stylized
game asset
game asset stylized
stylized
Input
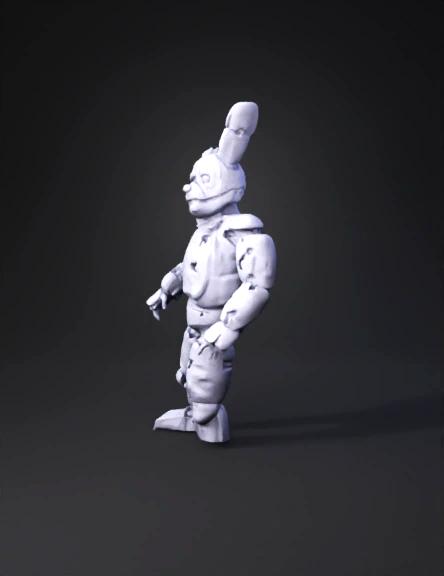
Prompt
Create a wearable, 3D-printable animatronic yellow rabbit suit that matches the attached reference photo as closely as possible (overall silhouette, chunky segmented look, hole shapes/placement style, face proportions, ear length, bowtie position). Wearer sizing (IMPORTANT) Fit for a human: height 1720 mm, weight 82 kg Make the suit slightly loose: add +25 mm clearance around the body wherever contact would happen (chest, waist, hips, thighs, upper arms). Include room for an undersuit and light padding. Do NOT scale randomly. Units must be millimeters. Modeling goals This is for cosplay + FDM 3D printing, not a game model. Output must be watertight, manifold, non-self-intersecting meshes. Maintain consistent wall thickness: 4 mm default, reinforced edges 6–8 mm around stress points and around the “torn hole” edges. All edges that touch the wearer must be rounded/filleted for comfort. Match the reference photo specifically Proportions: bulky torso, rounded segmented limbs, simplified mechanical look. Surface: plush-like rounded forms (not hyper-real metal), with clean segment seams. “Damage/holes”: replicate the big, blobby torn openings style seen in the photo. Holes must not destroy structural integrity: add an internal lip/rim around holes. Through-holes should reveal a black inner layer (either a separate inner shell part or a recessed void with a clean border). Face: similar muzzle, eye placement, jaw shape, and brow from the photo. Include a purple bowtie as a separate wearable part. Segmentation (must be MANY parts, wearable) Generate separate STLs for each piece, designed to fit on common printers. Assume printer bed 220×220×250 mm, so split large parts to fit. Head Helmet split: Front mask + Back skull Separate pieces: jaw, upper muzzle, cheek panels, brow panel Eye sockets: include LED/diffuser recess (leave space for lenses) Ears: each ear split into 3 segments + ear base, with optional rod channel for reinforcement Torso Chest front left/right Abdomen front left/right Back plate upper/lower Shoulder rings/caps (separate, to allow arm lift) Neck ring/collar (optional) Arms Bicep shells (L/R) Elbow caps (L/R) Forearm shells (L/R) Wrist cuffs (L/R) Hands: hand backplates + finger caps sized to fit over gloves Hips & Legs Hip/belt ring split into 2–4 parts Thigh shells (L/R) Knee caps (L/R) Shin shells (L/R) Ankle cuffs (L/R) Feet: foot armor shells that fit over shoes Assembly + real-world constraints (so it doesn’t “look right” but fail IRL) Add alignment keys: tongue-and-groove seams or pin holes (6 mm dowel standard) Add strap mounting slots (25 mm webbing) on torso, shoulders, thighs, shins Add magnet pockets (10×3 mm discs) on helmet seams and small closures (optional) Add joint clearances so parts don’t collide: shoulder/torso clearance for arm raise thigh/hip clearance for walking/sitting knee clearance for bending Include ventilation holes hidden under seams (helmet + torso) Keep inner surfaces smooth (no jagged supports baked into the mesh) Export / layout requirement (VERY IMPORTANT) Export each part as its own STL with clean naming: HEAD_front.stl, ARM_L_bicep_A.stl, etc. Provide a side-by-side “print layout” scene: all parts placed next to each other on the ground plane oriented in print-friendly directions (flat where possible) Provide a parts list describing: what each part is suggested print orientation which parts connect together HARD “DO NOT” LIST (common AI screwups) Do NOT output a single fused statue mesh. Do NOT make paper-thin shells (<3 mm). Do NOT leave non-manifold edges, holes in the mesh, or intersecting geometry. Do NOT add micro-greebles that won’t print. Do NOT scale in meters or random units. Use mm. Do NOT make joints that collide or cannot move.
Detailed Info
Related Models
Enter invite code
Enter invite code to get credits!