3D Workspace
Home
Assets
Affiliate Program
Creator Program
Sign up/Log in
View Plans
DCC Bridge
info
11-13 20:51
Model Name
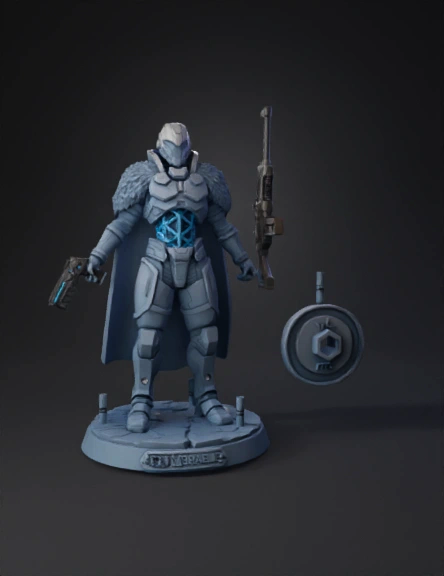
futuristic armored figure 3d model
Tags
3d printing
3d printing realistic
character
character 3d printing
character 3d printing realistic
character realistic
futuristic armored figure
realistic
Prompt
Model overview (deliverable) • Single watertight 3D model exported as STL (binary) and OBJ with units in millimetres (mm). • Recommended final print height: 180–220 mm (adjustable). • Model split into logical parts for printing and finishing: body (main statue), pistol (right hand), rifle (slung), and optional base. Parts must be keyed for precise reassembly. Geometry & mesh • Watertight, manifold mesh (no non-manifold edges, no open holes). Repair with Meshmixer/Blender and validate in a slicer.  • Minimum printable feature: no features thinner than 0.8–1.0 mm for FDM; 0.4–0.6 mm safe for SLA. • All fine details (fur, cloth folds) preserved as surface relief; consider normal maps for visuals but keep actual mesh detail for SLA prints. Hollowing & internal structure • For SLA resin prints: hollow the model to save resin, set wall thickness 1.5–2.0 mm, and add at least two drain/vent holes (3–5 mm) placed at low points. Use PreForm/Meshmixer to hollow and add vents.  • If hollowed, add small internal ribs or a simple lattice to prevent collapse during handling. Splitting & assembly • Split large overhang-heavy subassemblies: separate rifle and pistol from torso; split body vertically at a concealed seam (back) for cleaning/printing. Add alignment pegs (2–3 mm diameter) and 0.2 mm tolerance for press fit. • For delicate connections (ears, fingers), print as separate reinforced parts or orient to avoid supports across thin edges. Orientation & supports • Orient parts to minimize supports on visible surfaces (face, front of robe, hands). Overhangs >45° require supports for FDM; SLA can handle shallower overhangs but still needs supports for free-floating geometry.  • Place rifle horizontally across build plate when printed as separate part to keep barrel straight and avoid sagging. Print settings (recommended) • SLA resin (best detail): layer height 25–50 µm, standard supports, wash and UV cure. Hollow with vents. Use standard casting/figure resin for fine detail.  • FDM (larger models): nozzle 0.4 mm, layer height 0.12–0.2 mm, 3–4 perimeters, 15–25% infill (solid for base), enable supports for overhangs, use brim for stability.  Wall thickness, tolerances & strength • Visible surfaces: 1.5–2.0 mm minimum wall thickness (SLA can use thinner internally if solid). • Structural joints: use 2–3 mm dowel pins; glue with cyanoacrylate or epoxy. • If model is to be handled frequently, increase internal thickness or print in stronger material (PETG/ABS or tough resin). File export & pre-slice checks • Units: mm. Export high-resolution STL and a compatible OBJ with normals. • Run mesh-repair and water-tightness check (Netfabb/PrusaSlicer/Meshmixer). Ensure manifold and no intersecting meshes.  Post-processing & finishing • SLA: wash in isopropyl alcohol, UV cure, sand supports, primer, paint. • FDM: remove supports, sand layer lines, apply filler primer, paint. Use epoxy filler for visible seams. Base & mounting • Design a flat, slightly chamfered base (diameter or footprint to match pose) with embedded metal screw nut (M4) or keyed peg for secure mounting. Consider slight chamfer on bottom for trimming.  Optional: marketplace/AI pipeline note • If using Tripo/AI-to-3D service, generate high-res mesh and export STL/OBJ; then apply the above hollowing, repair and split steps before slicing.  If you want, I can now: • produce a short printable checklist (STL export checklist + slicer settings) tailored to SLA or FDM, or • list exact dimensions and peg sizes for assembly given a final desired height.
Detailed Info
Related Models
Enter invite code
Enter invite code to get credits!
 info
info


 info
info