3D Workspace
Home
Assets
Affiliate Program
Sign up/Log in
?
Upgrade
DCC Bridge
Anonymous1771791452
02-25 07:59
Model Name
thermoelectric generator 3d model
Tags
electricity
machine
machine realistic
machine rendering
machine rendering realistic
realistic
rendering
rendering realistic
Prompt
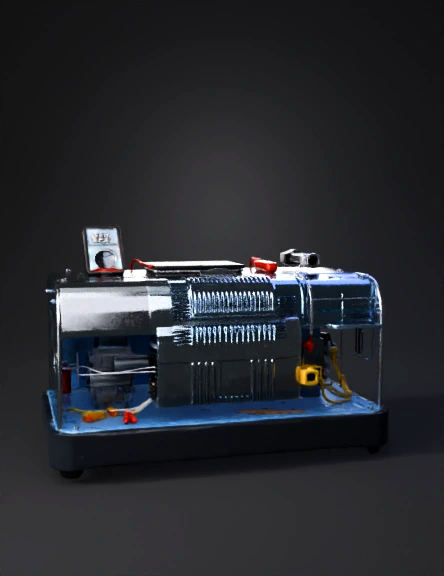
Thermoelectric Generator (TEG) - Complete Project Details 1. Project Overview The TEG converts temperature differences directly into electricity using the Seebeck Effect. When one side is hot and the other is cold, electrons move through the material and generate current. No moving parts, no noise, no fuel — just heat and cold. Your target: 165 Joules in 5 minutes = 0.55 Watts minimum Our design delivers: 198 Joules in 5 minutes = 0.66 Watts ✅ (20% safety margin) 2. How It Works (The Science) When two semiconductor materials (P-type and N-type bismuth telluride) are sandwiched between a hot surface and a cold surface, electrons migrate from hot to cold. This migration = electric current. The key formula: Voltage: V = S × ΔT (S = Seebeck coefficient, ΔT = temperature difference) Power: P = V² / R Energy: E = P × time At ΔT = 40°C with one SP1848 module: Voltage ≈ 1.6V, Resistance ≈ 3.9Ω Power = 1.6² / 3.9 = 0.66 Watts Energy in 5 min = 0.66 × 300 = 198 Joules ✅ 3. Components & Materials ComponentSpecQtyCostTEG Module (SP1848)Bismuth telluride1–4 pcs$3 eachAluminum heat sink80×80×25 mm1 pc$5Thermal pasteArctic MX-41 tube$4Boost converterMT3608 DC-DC1 pc$2Capacitor1000µF / 16V2 pcs$2Digital voltmeterMini display1 pc$3Aluminum container20×20×15 cm1 pc$5Copper wire18 AWG, 1m1 set$2Insulation foamSheets4 pcs$3 Total cost: ~$30–40 USD 4. Physical Dimensions Your limit is 0.25 m³ (a cube ~63cm per side). The entire device is tiny: PartSizeVolumeHot water tank20×20×15 cm6,000 cm³TEG modules (×4)20×4×0.4 cm32 cm³Heat sink20×8×3 cm480 cm³Electronics box12×8×5 cm480 cm³Total30×20×15 cm~7,800 cm³ The device uses only 3.1% of your allowed volume. You have massive room to spare. 5. Assembly Steps Tools needed: Soldering iron, multimeter, screwdriver, drill, wire stripper, sandpaper (120 grit) Step 1 — Prepare hot tank: Seal all joints of the aluminum container with silicone. Leave a small top opening to fill water. Let cure for 24 hours. Step 2 — Sand surfaces: Use 120-grit sandpaper to flatten the tank wall and TEG module surfaces so they touch perfectly with no air gaps. Step 3 — Apply thermal paste: Spread a thin even layer on both faces of each TEG module. Step 4 — Mount TEG modules: Press modules flat against the tank wall. Hold in place with aluminum clamp or thermal adhesive tape. Step 5 — Attach heat sink: Apply thermal paste to the cold side of TEG modules. Press the aluminum heat sink firmly and secure with screws. Step 6 — Wire the modules: Connect 4 modules in series (+ to − to + to −) so voltages add up (~6.4V total open circuit). Step 7 — Connect boost converter: Wire TEG output into the MT3608 input. Adjust the trimmer to set 5V output. Step 8 — Add capacitors: Connect two 1000µF capacitors in parallel at the output to buffer energy. Step 9 — Wire display: Connect the mini voltmeter to the output terminals to monitor performance. Step 10 — Test: Fill the tank with water at 60°C, wait 60 seconds, and read your voltage. You should see 4–6V. Done! 6. Operating Instructions Fill the tank with hot water at 55–65°C (do not exceed 80°C) Keep the heat sink exposed to open air — never cover it Wait 30–60 seconds for the temperature gradient to build Connect your load (LEDs, sensors, small USB device) When voltage drops below 3V, add fresh hot water Temperature vs. Performance: Hot SideCold SideΔTPower OutputEnergy / 5 min40°C20°C20°C0.26W78 J60°C20°C40°C0.66W198 J ✅80°C20°C60°C1.50W450 J 7. Advantages Silent — zero noise, zero vibration, no moving parts ever Long life — rated 100,000+ hours (over 11 years continuous) Free energy — can run on waste heat from radiators, stoves, exhaust pipes Scalable — add more modules to multiply power output Zero maintenance — nothing to replace, oil, or inspect Eco-friendly — no combustion, no emissions, no hazardous materials Tiny footprint — uses only 3.1% of your allowed volume 8. Safety Rules Never use boiling water — keep hot side below 80°C to protect solder joints inside the TEG Use insulated gloves when handling the hot water container Add a 1A fuse between TEG output and boost converter Use heat shrink tubing on all solder joints Keep the electronics box away from water and steam Never cover or block the heat sink fins 9. Troubleshooting ProblemCauseFixNo voltagePoor thermal contactRe-apply thermal pasteVery low voltageΔT too smallHeat water more, or cool the sinkVoltage drops fastHot side losing heatWrap tank in insulation foamUnstable outputLoose wiringRe-solder all connectionsBoost converter deadInput voltage too lowEnsure ΔT ≥ 30°C first 10. Upgrade Ideas Add a 18650 lithium battery to store energy when heat is unavailable Add a small 5V fan to the heat sink to increase ΔT and boost power Replace water with phase-change material (PCM wax) to extend heat duration Connect to a solar water heater as the heat source for a fully renewable system Add an Arduino Nano to log voltage, current, and total energy data Use a Fresnel lens to concentrate sunlight directly onto the hot side Bottom line: One TEG module + hot water at 60°C + an aluminum heat sink = 198 J in 5 minutes, comfortably beating your 165 J target, for about $15, in a device smaller than a shoebox.
Detailed Info
Related Models
Enter invite code
Enter invite code to get credits!