3D Workspace
Home
Assets
Affiliate Program
Sign up/Log in
?
Upgrade
DCC Bridge
Anonymous1766743783
12-27 14:30
Model Name
human head 3d model
Tags
character
rendering
realistic
Input
Prompt
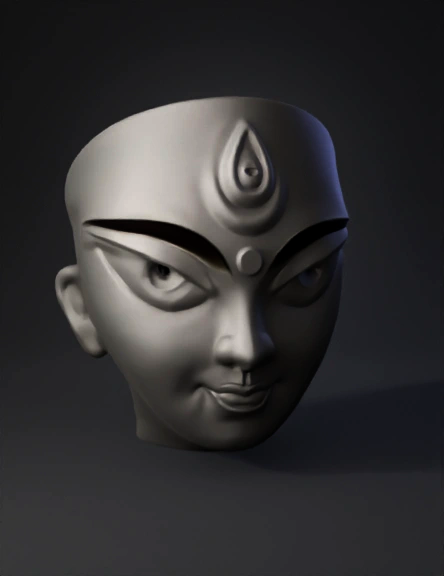
This image is a 3D digital sculpt (likely created in software like ZBrush or Blender) of the face of Goddess Durga. It captures the iconic "Chokh" (eyes) and "Trinayan" (third eye) that are central to her traditional iconography. Below is a breakdown of the visual features and a guide on how to approach sculpting this, whether you are using digital tools or physical clay. 1. Visual Characteristics of the Image Symmetry: The face is perfectly symmetrical, conveying a sense of divine balance and calm power. The Eyes (Chokkhudan): Large, almond-shaped eyes with sharp, elongated outer corners. The pupils are centered and intense. The Third Eye (Trinayan): Positioned in the center of the forehead, it is teardrop-shaped with a stylized flame or "bindu" inside, symbolizing spiritual insight. The Lips: A subtle, serene "Mona Lisa" smile—upturned corners that suggest compassion and victory. The Surface: Smooth, matte finish with soft ambient occlusion (shadowing) around the nose and eye sockets to define depth. 2. Sculpting Guide (Step-by-Step) Phase 1: Blocking the Proportions The Base Egg: Start with a basic egg shape for the head. Flatten the top slightly where the hair or crown will eventually sit. The T-Zone: Mark a vertical centerline and a horizontal eye line. In Durga iconography, the eyes are usually placed slightly higher than a standard human face to give a more "ethereal" look. Basic Volumes: Add clay (or digital volume) for the brow ridge, the bridge of the nose, and the chin. Phase 2: Defining the Features The Nose: Sculpt a straight, sharp nose. Keep the nostrils petite and the tip slightly rounded but firm. The Eyes: Instead of deep-set sockets, keep the eyelids relatively "flush" with the face. Use a carving tool to create the sharp, sweeping curves of the upper and lower lids. The Mouth: Focus on the "cupid's bow" of the upper lip. Ensure the corners of the mouth are tucked in slightly to create that gentle smile. Phase 3: The Iconography (The Detail Work) The Third Eye: This should be slightly raised (bas-relief). Create a teardrop outline first, then add the circular "eye" inside it. The Bindi: Place a small, perfect circle between the brows, just below the third eye. Sharpening Edges: Use a fine-point tool to define the crease of the eyelids and the line where the lips meet. 3. Tips for Success Digital Sculpting: Use a Symmetry Modifier. Use the "Smooth" brush frequently to achieve that porcelain-like skin texture shown in the image. Traditional Clay: Use a damp sponge or a soft brush with water to smooth out finger marks. For the sharp lines around the eyes, use a metal needle tool or a fine wooden modeling tool. Lighting: When sculpting, keep your light source coming from the side or top-down (as seen in the image). This helps you see the "planes" of the face and ensures the cheeks and brow have the right depth.
Detailed Info
Related Models
Enter invite code
Enter invite code to get credits!