3D Workspace
Home
Assets
Affiliate Program
Sign up/Log in
?
Upgrade
DCC Bridge
Anonymous1766689250
12-31 16:28
Model Name
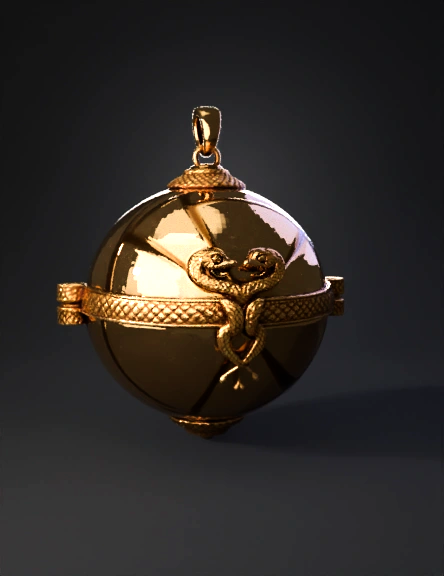
gold pendant 3d model
Tags
3d printing
3d printing realistic
gold pendant
props
props 3d printing
props 3d printing realistic
props realistic
realistic
snake pendant
sphere
Input
Prompt
To create a high-quality 3D model of this pendant, you should approach it as a multi-part assembly. This ensures clean geometry and makes it easier to apply different textures or prepare it for 3D printing. Here is a breakdown of the components and the workflow to model them: 1. Component Breakdown The object consists of four primary structural elements: The Main Sphere: The central gold body, split by a horizontal band. The Ornamental Band: A textured belt with side hinges. The Twin Snakes: A relief sculpture (bas-relief) on the front. The Finials (Top & Bottom): The textured caps and the hanging loop (bail). 2. Modeling Workflow Phase A: The Core Geometry Sphere: Start with a high-resolution UV sphere. Use a Boolean or a simple Loop Cut to separate it into a top and bottom hemisphere if you want it to look like a functional locket. The Band: Create a thin cylinder or a torus flattened on the inner side. Fit it snugly around the sphere's "equator." Side Hinges: Model small rectangular blocks with rounded edges. Use a Cylinder to create the pin-joint look on the far left and right of the band. Phase B: The Snake Relief This is the most complex part and is best handled via Sculpting or Displacement Maps: Path Method: Draw the silhouette of the intertwined snakes using Bezier Curves. Give the curves depth (bevel), then convert them to a mesh. Detailing: Use a "Snake Skin" alpha brush in sculpting mode to apply the scales. Placement: Use a Shrinkwrap Modifier to ensure the snakes follow the curvature of the sphere perfectly. Phase C: Texture and Patterns The "braided" or "knurled" texture on the band and finials can be achieved in two ways: Geometric (High Poly): Use a Displacement Modifier with a Voronoi or cellular texture to physically move the vertices into a scale pattern. Shader (Low Poly): Use a Normal Map or Bump Map to simulate the texture without increasing the polygon count. 3. Recommended Tools 4. Technical Tips for Realism Beveling: Never leave a 90-degree "sharp" edge. In real life, even sharp jewelry has a microscopic radius. Beveling the edges of the band and hinges will catch the light realistically. Lighting: Use an HDRI environment map (like a studio setup) to get those long, elegant reflections seen in the photo. Scale: If you plan to 3D print this, ensure the "loop" at the top is thick enough to support the weight of the metal. Would you like me to provide specific steps for a particular software, like Blender or ZBrush?
Detailed Info
Related Models
Enter invite code
Enter invite code to get credits!