3D Workspace
Home
Assets
Affiliate Program
Sign up/Log in
?
Upgrade
DCC Bridge
Anonymous1766428016
12-22 18:32
Model Name
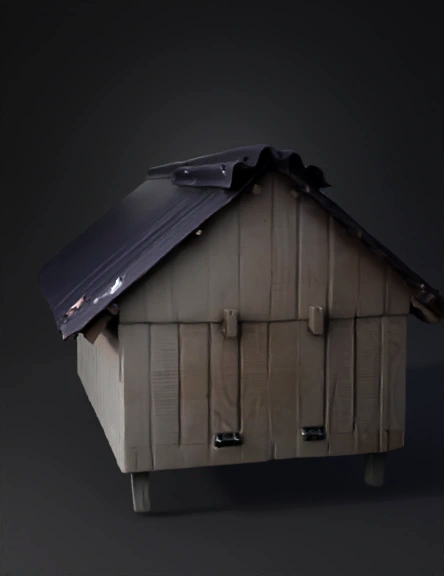
dog house 3d model
Tags
architecture
architecture realistic
architecture rendering
architecture rendering realistic
dog house
realistic
rendering
rendering realistic
shelter
Input
Prompt
Video name:(on youtube) Building an Outdoor Cat Shelter For An Undeserving Cat by @SSLFamilyDad 1. Materials Needed Frame ("Beams"): (8) 8ft 2x4 boards. Siding, Floor & Baffle: (2) 4x8 ft sheets of 1/2" exterior-grade plywood (not T1-11 or OSB). Plywood is better for cutting strips than OSB. Roofing: (2) 38" x 38" Ondura Premium Half-Panels. You can buy at tractor supply for 34$ Base Legs: Scraps of 2x6 treated wood (or bricks) for elevation. Hardware: (2) 3-inch Zinc-Plated T-Hinges (for the side door). (1) Barrel Bolt Latch. Box of 2 1/2" deck screws (frame). Box of 1 1/4" exterior screws or galvanized siding nails (for lap siding). (1) Tube of Exterior Caulk and a can of Exterior Paint (to waterproof the plywood). 2. Cut List & Measurements The Base (Floor) Frame: Cut (2) 2x4s to 48 inches and (2) 2x4s to 33 inches. Screw into a rectangle. Floor Deck: Cut one piece of plywood to 48" x 36". Screw it on top. The Wall Frame ("Beams") Corner Posts: Cut (4) 2x4s. Cut two to 24 inches (front) and two to 20 inches (back) for the roof slope. Top Plates: Cut (2) 2x4s to 48 inches (front/back tops) and (2) 2x4s to 33 inches (side tops). Internal Stud: Cut one 2x4 to 24 inches for the baffle wall support. Plywood Lap Siding Strips & Internal Baffle Siding Strips: Rip the two 4x8 ft plywood sheets into 6-inch wide horizontal strips using a circular saw or table saw. Internal Baffle Wall: Cut one piece of plywood to 12" wide x 24" tall. 3. Assembly Step-by-Step Build the Skeleton: Assemble the base, corner posts, and top plates. The "Extra Wall" (Baffle): Install the 24" stud 12 inches from the front corner. Attach your 12"x24" baffle wall to it. This creates the L-shaped hallway. Install Lap Siding: Starter Strip: Nail a thin 1/2" thick strip of wood to the very bottom of the frame's exterior to angle the first row. Attach Strips: Start from the bottom. Nail the first 6-inch strip just above the starter strip. The next strip overlaps by 1 inch (5 inches exposed). Continue up the wall, screwing into the 2x4 studs through the top of the strip. Entrance Holes: Once the strips are on the front wall, use a jigsaw to cut your 6-inch door holes (one outer on the front left, one inner on the internal baffle wall right). The Hinged Side Panel: Build this wall as a separate unit on the ground using 2x4s. Attach the lap siding strips to it. Attach this entire finished panel to the house using your 3-inch hinges at the top frame. Install the barrel bolt latch at the bottom. Install Lofts: Screw 2x4 scraps to the inside studs at 10" and 18" high. Screw plywood scraps on top for platforms. Roofing & "Extra Pieces": Overlap your two 38"x38" Ondura panels so they cover the full 48-inch length with overhangs. The "Extra Pieces": Cut a 4-inch strip of leftover Ondura and screw it across the very top front edge where the roof meets the wall to seal against rain. 4. Critical Final Step: Waterproofing the Plywood Seal All Edges: Run a bead of caulk or glue along every cut edge of the plywood strips before installation. Caulk the Corners: Use caulk on all vertical seams where corners meet. Paint: Apply two thick coats of exterior paint to the entire outside. This makes the cheap plywood look like professional lap siding from the video. Elevate: Place the house on 2x6 blocks or bricks.
Detailed Info
Related Models
Enter invite code
Enter invite code to get credits!