3D Workspace
Home
Assets
Affiliate Program
Sign up/Log in
?
Upgrade
DCC Bridge
Anonymous1761206699
11-13 20:51
Model Name
futuristic armored figure 3d model
Tags
character
3d printing
realistic
Prompt
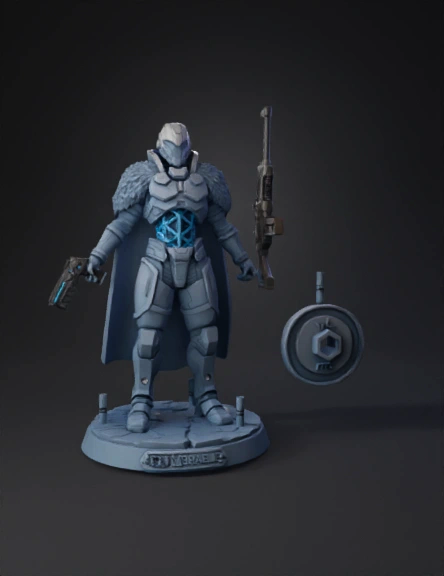
Model overview (deliverable) • Single watertight 3D model exported as STL (binary) and OBJ with units in millimetres (mm). • Recommended final print height: 180–220 mm (adjustable). • Model split into logical parts for printing and finishing: body (main statue), pistol (right hand), rifle (slung), and optional base. Parts must be keyed for precise reassembly. Geometry & mesh • Watertight, manifold mesh (no non-manifold edges, no open holes). Repair with Meshmixer/Blender and validate in a slicer.  • Minimum printable feature: no features thinner than 0.8–1.0 mm for FDM; 0.4–0.6 mm safe for SLA. • All fine details (fur, cloth folds) preserved as surface relief; consider normal maps for visuals but keep actual mesh detail for SLA prints. Hollowing & internal structure • For SLA resin prints: hollow the model to save resin, set wall thickness 1.5–2.0 mm, and add at least two drain/vent holes (3–5 mm) placed at low points. Use PreForm/Meshmixer to hollow and add vents.  • If hollowed, add small internal ribs or a simple lattice to prevent collapse during handling. Splitting & assembly • Split large overhang-heavy subassemblies: separate rifle and pistol from torso; split body vertically at a concealed seam (back) for cleaning/printing. Add alignment pegs (2–3 mm diameter) and 0.2 mm tolerance for press fit. • For delicate connections (ears, fingers), print as separate reinforced parts or orient to avoid supports across thin edges. Orientation & supports • Orient parts to minimize supports on visible surfaces (face, front of robe, hands). Overhangs >45° require supports for FDM; SLA can handle shallower overhangs but still needs supports for free-floating geometry.  • Place rifle horizontally across build plate when printed as separate part to keep barrel straight and avoid sagging. Print settings (recommended) • SLA resin (best detail): layer height 25–50 µm, standard supports, wash and UV cure. Hollow with vents. Use standard casting/figure resin for fine detail.  • FDM (larger models): nozzle 0.4 mm, layer height 0.12–0.2 mm, 3–4 perimeters, 15–25% infill (solid for base), enable supports for overhangs, use brim for stability.  Wall thickness, tolerances & strength • Visible surfaces: 1.5–2.0 mm minimum wall thickness (SLA can use thinner internally if solid). • Structural joints: use 2–3 mm dowel pins; glue with cyanoacrylate or epoxy. • If model is to be handled frequently, increase internal thickness or print in stronger material (PETG/ABS or tough resin). File export & pre-slice checks • Units: mm. Export high-resolution STL and a compatible OBJ with normals. • Run mesh-repair and water-tightness check (Netfabb/PrusaSlicer/Meshmixer). Ensure manifold and no intersecting meshes.  Post-processing & finishing • SLA: wash in isopropyl alcohol, UV cure, sand supports, primer, paint. • FDM: remove supports, sand layer lines, apply filler primer, paint. Use epoxy filler for visible seams. Base & mounting • Design a flat, slightly chamfered base (diameter or footprint to match pose) with embedded metal screw nut (M4) or keyed peg for secure mounting. Consider slight chamfer on bottom for trimming.  Optional: marketplace/AI pipeline note • If using Tripo/AI-to-3D service, generate high-res mesh and export STL/OBJ; then apply the above hollowing, repair and split steps before slicing.  If you want, I can now: • produce a short printable checklist (STL export checklist + slicer settings) tailored to SLA or FDM, or • list exact dimensions and peg sizes for assembly given a final desired height.
Detailed Info
Related Models
Enter invite code
Enter invite code to get credits!